INTRODUCTION
by Bill Fawcett
You are in command, the King of Amber. With a blare of trumpets accented by a hurriedly barked order, it’s off to battle. Riding behind are your lancers, trained warriors, whose lives depend upon the decisions you are about to make as you fight your way down the Black Road towards the Courts of Chaos.
Combat Command books provide more than just another chance to read an exciting military adventure featuring Random and the Royal Lancers of Castle Amber. You could simply “read” this book, tracing a route through the sections, but these books are also a “game” which lets you make the command decisions. This book is divided into sections rather than chapters. In each section of this game/book a military situation is described. Your choices actually write the book, the story and the ending both being determined by the combat decisions you make.
A careful effort has been made to make these adventures as “real” as possible. You are given the same information as you would receive in a real combat situation. At the end of each section is a number of choices for what to order next. The consequences of the action you pick are described in the following section. When you make the right decisions, you are closer to successfully completing your mission. When you make a bad decision, lancers die …men who are not going to be available for the next battle.
FIGHTING BATTLES
This book includes a simple game system which simulates combat and other military challenges. Playing the game adds an extra dimension of enjoyment by making you a participant in the adventure. You will need two six-sided dice, a pencil, and a sheet of paper to “play” along with this adventure.
COMBAT VALUES
In this book, the force you command will consist of mounted lancers. Each is assigned five values. These values provide the means of comparing the capabilities of the many different military units encountered in this book. These five values are:
Manpower. This value is the number of separate fighting parts of your force. Each unit of Manpower represents one man. Casualties are subtracted from Manpower.
Ordnance. The quality and power of the weapons used is reflected by their Ordnance Value. All members of a unit commanded will have the same Ordnance Value. In some cases you may command two or more units, each with a different Ordnance Value.
Attack Strength. This value indicates the ability of the unit to attack an opponent. It is determined by multiplying Manpower by Ordnance (Manpower X Ordnance = Attack Strength). This value can be different for every battle. It will decrease as Manpower is lost and increase if reinforcements are received.
Melee Strength. This is the hand-to-hand combat value of each member of the unit. In the case of a squad of mercenaries, it represents the martial arts skill and training of each man. In crewed units such as tanks or spaceships, it represents the fighting ability of the members of the crew and could be used in an assault on a spaceport or to defend against boarders. Melee Value replaces Ordnance Value when determining the Attack Strength of a unit in hand-to-hand combat.
Stealth. This value measures how well the members of your unit can avoid detection. It represents the individual skill of each soldier or the ECM of each spaceship. The Stealth Value for your unit will be the same for each member of the unit. You would employ Stealth to avoid detection by the enemy.
Morale. This reflects the fighting spirit of the troops you command. Success in battle may raise this value. Unpopular decisions or severe losses can lower it. If you order your unit to attempt something unusually dangerous, the outcome may be affected by their Morale level.
THE COMBAT PROCEDURE
When your unit finds itself in a combat situation, use the following procedure to determine victory or defeat.
The unit you command always fires first unless otherwise stated.
When you are told there is a combat situation, you will be given all the information needed for both your command and their opponent.
Here is an example of a complete combat:
Hammer’s Slammers have come under fire from a force defending a ridge that crosses their line of advance. Alois Hammer has ordered your company of tanks to attack. Your tanks have an Ordnance Value of 8 and you have a Manpower Value of 8 tanks.
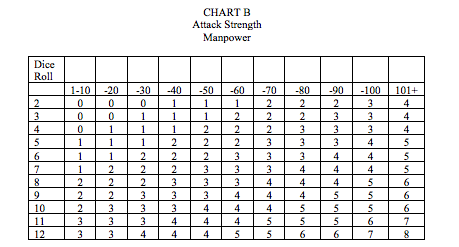
Slammers fire using Chart B.
Locals fire using Chart D with a Combat Strength of 3 and Manpower of 12 (giving them an Attack Strength of 36). To begin, you attack first and roll two 4s for a total of 8. The current Attack Strength of your Slammers is 64 (8 X 8).
Read down to the 60 to 70 Attack Strength column until you get to the line for a dice roll of 8. The result is four casualties inflicted on your opponents by your company.
Subtract these casualties from the opposing force before determining their Attack Strength. (Combat is not simultaneous.) After subtracting the four casualties you just inflicted on them, the enemy has a remaining Manpower Value of 8, (12 - 4 = 8). This gives them a remaining Attack Value of 24 (8 X 3 = 24).
Roll two six-sided dice for the opposing force’s attack and determine the casualties they cause your Slammer’s company. Subtract these casualties from your Manpower total on the Record Sheet. In this case they caused one casualty, giving the Slammers a Manpower of 7 for the next round of combat.
This ends one “round” of combat. Repeat the process for each round. Each time a unit receives a casualty, it will have a lower value for Attack Strength. There will be that many less men, tanks, spaceships or whatever firing.
Continue alternating fire rolls, recalculating the Attack Strength each time to account for casualties, until one side or the other has lost all of its Manpower, or special conditions (given in the text) apply. When this occurs, the battle is over.
Losses are permanent, and losses from your unit should be subtracted from their total Manpower on the Record Sheet.
SNEAKING, HIDING, AND OTHER RECKLESS ACTS
To determine if a unit is successful in any attempt relating to Stealth or Morale, roll two six-sided dice. If the total rolled is greater than the value listed for the unit, the attempt fails. If the total of the two dice is the same as or less than the current value, the attempt succeeds or the action goes undetected. For example:
Rico decides his squad of Mobile Infantry (M.I.) will try to penetrate the Bug hole unseen. M.I. have a Stealth Value of 8. A roll of 8 or less on two six-sided dice is needed to succeed. The dice are rolled and the result is a 4 and a 2 for a total of 6. They are able to avoid detection by the Bug guards.
If all of this is clear, then you are ready to turn to Section 1 and take command.
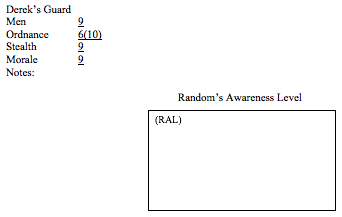
RANDOM AWARENESS LEVEL (RAL)
This is a measure of how aware King Random is of Derek’s actions. It has a major role in determining Derek’s success.